Bridges
Home
/ Bridges Info / Porter
Brook
/ River Sheaf /
Rivers Loxley & Rivelin / River
Don / All Bridges / Bridges Links
/
All
Map / Sitemap / Dams
Info about layout of bridges on this site
and to avoid excessivly long web pages.
There is an overall ' All Bridges' map only page with All bridges on it
(as well as a single 'All Map' with Everything (bridges & dams) on it).
Each river has its own Map only 'summary' page, which details the sections of that river.
The sites are numbered consecutively within each section, higher numbers are further downstream.
Pipes &/or service crossings (i.e. not crossable) are numbered by a letter after the previous bridge.
Each page has a map with numbered markers and labels which link to the relevant content on the details page.
LHS menu: lower-case items are for potential future expansion, see future construction notes.
as are the river section codes (above and on relevant pages) without hyperlinks.
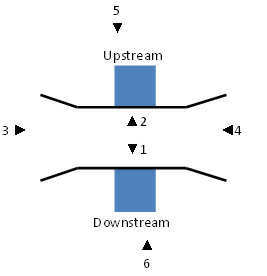
| Each bridge site has 6
photos, organised
consistently, being: |
| 1 - looking downstream from the bridge, 2 - looking upstream from the bridge, 3 - looking across the bridge, usually to the downstream side, 4 - looking across the bridge, usually to the upstream side, 5 - looking downstream, back at the bridge, 6 - looking upstream, back at the bridge. |
| Culverts generally have two locations, the start/entrance (photo 1 & 6 not possible), and the end/exit (photo 2 & 5 not possible). |
Please note - some sites are on private land, so access is not always available. Where a photo is not possible, due to no view etc, that area is greyed out, and n/a or n/t may be appended to the intended photo number. Where a photo is very unlikley, due to private land (railway) etc, that area is pale-greyed out. If the name of a picture appears in a white rectangle - I haven't taken a photo yet!
|
| The Links
page is exactly that, links to other websites with info &/or pictures associated with the Porter Brook and the other rivers and their bridges. |
Please email any corrections, comments or suggestions
about the site to
the -
-
Design and construction by Nick Harrison.
Thanks to Miguel Marnoto for JS code for
creating multiple markers
(http://en.marnoto.com/2013/12/mapa-com-varios-marcadores-google-maps.html)
and to Concept211 for individually numbered marker icons
(https://github.com/Concept211/Google-Maps-Markers)
All information believed to be correct at
time of publication.
The author cannot be held responsible for the availability or content
of external websites